Tuesday, June 28, 2011

Summer Fun: Almost Instant Strawberry Ice Cream

Strawberry Ice Cream!
Before strawberry season ended in our area, we picked a large amount of strawberries, and ate them with whipped cream until our bellies were stuffed. 

I make my whipped cream from scratch because it's natural and because I like to show my children where foods come from and how they're made. And, really, it's cool.

Whipped Cream:  All you need is a container of heavy whipping cream (we buy organic), some sugar, and a mixer. Pour the container of cream into the mixing bowl and whip at a high speed until fluffy and firm. Add 1 - 2 Tablespoons powdered sugar (I've used granulated and it's fine, powdered just works a little better.) to taste. Just don't eat it all at this stage.

My only recommendation: DO NOT WHIP THE CREAM TOO LONG or it will turn into butter. I have actually done this because I have a habit of starting a cooking project then getting distracted. Squirrel! (Sugared butter is yummy, but not really what you want on your jello.)

Anyway, on to the ice cream. The whole process was a lot of fun! 

Plastic Bag Ice Cream

1 cup whole milk (or a mixture of milk and cream).
1/4 cup of sugar
1/2 tsp of vanilla extract
diced strawberries (about 1/2 cup)

Into a quart sized zip-lock bag, pour all the ingredients. Zip to seal, and add a length of tape over the zipped edge just to make sure the bag doesn't open while you're jostling* it around.

Place the quart-sized bag into a gallon-sized bag and add some ice. (I used about 4 or 5 cups.) Pour about a cup of rock salt over the ice, seal the bag and shake the bag back and forth for about 5 - 10 minutes, turn it, knead it, jostle it. Whatever. A pair of winter gloves helps because the bag is very cold.

I never buy strawberry ice cream at the store, but our homemade ice cream was so fantastic! The local strawberries were so fresh and sweet, it really made a difference.

Obviously, you can make any flavor of ice cream with this recipe. Eliminate the strawberries and add chocolate chips, cocoa powder, mint extract, etc. Many thanks the the leader of our local Children's Garden for sharing this recipe.

* I actually talk like that.

Saturday, June 18, 2011

Summer Fun: Old-Fashioned Tree Swing

There are few things that can evoke images of summers long past like a tree swing. The super-long ropes give tree swings a long, smooth arc that gives you the sensation of flying.

My kids decided they wanted a tree swing and we made it in one day! (That's quite a feat for us--my husband and I can stretch a home-improvement project out for months, years even. We're pros at that.)

My husband cut a 1x8 plank of wood we had in the basement into two 2-foot lengths. I glued the two pieces together (using clamps to hold them tight) and drilled holes at either end. I painted the wood a bright yellow using leftover paint.

While that dried, we got the lengths of rope into the tree. We tied twine to a sock with a tennis ball inside and threw the sock-ball over a somewhat horizontal branch.

Then we tied the rope to the twine and pulled the rope over the branch. We kept pulling until we brought the rope all the way back to ourselves and untied the twine.

We only wanted a single length of rope on each side of the swing, so I tied the rope onto a steel ring that we had gotten at the hardware store (get one that holds more than 100 pounds). I used some crazy knot I know by heart, but don't know the name of (bowline? double sheet bend?). I cut the other end of the rope and threaded it through the ring and pulled the rope to fasten it around the branch.

I'm hoping that this doesn't "choke" the branch. If no weight is on the swing, there is almost no pressure on the branch, so as it grows, the ring/rope-loop will simply widen with the branch.

Then we threaded the rope through the hole drilled into seat and did the crazy knot again. We did this whole routine to the other side, and within a few hours, we had a fabulous tree swing. My kids LOVE this swing and have played on it almost every day so far this summer.

A closeup of the ring-loop

Summer Fun: Cherry Pickin' and Pie

I'm a little behind on my posts because I'm having so much fun this summer! Yay! But I will do my best to  catch up while still having fun!

Early in June, some friends said we could pick their sour cherries. Who could resist? Free food and a fun summertime activity all in one. Plus the hope of pie.

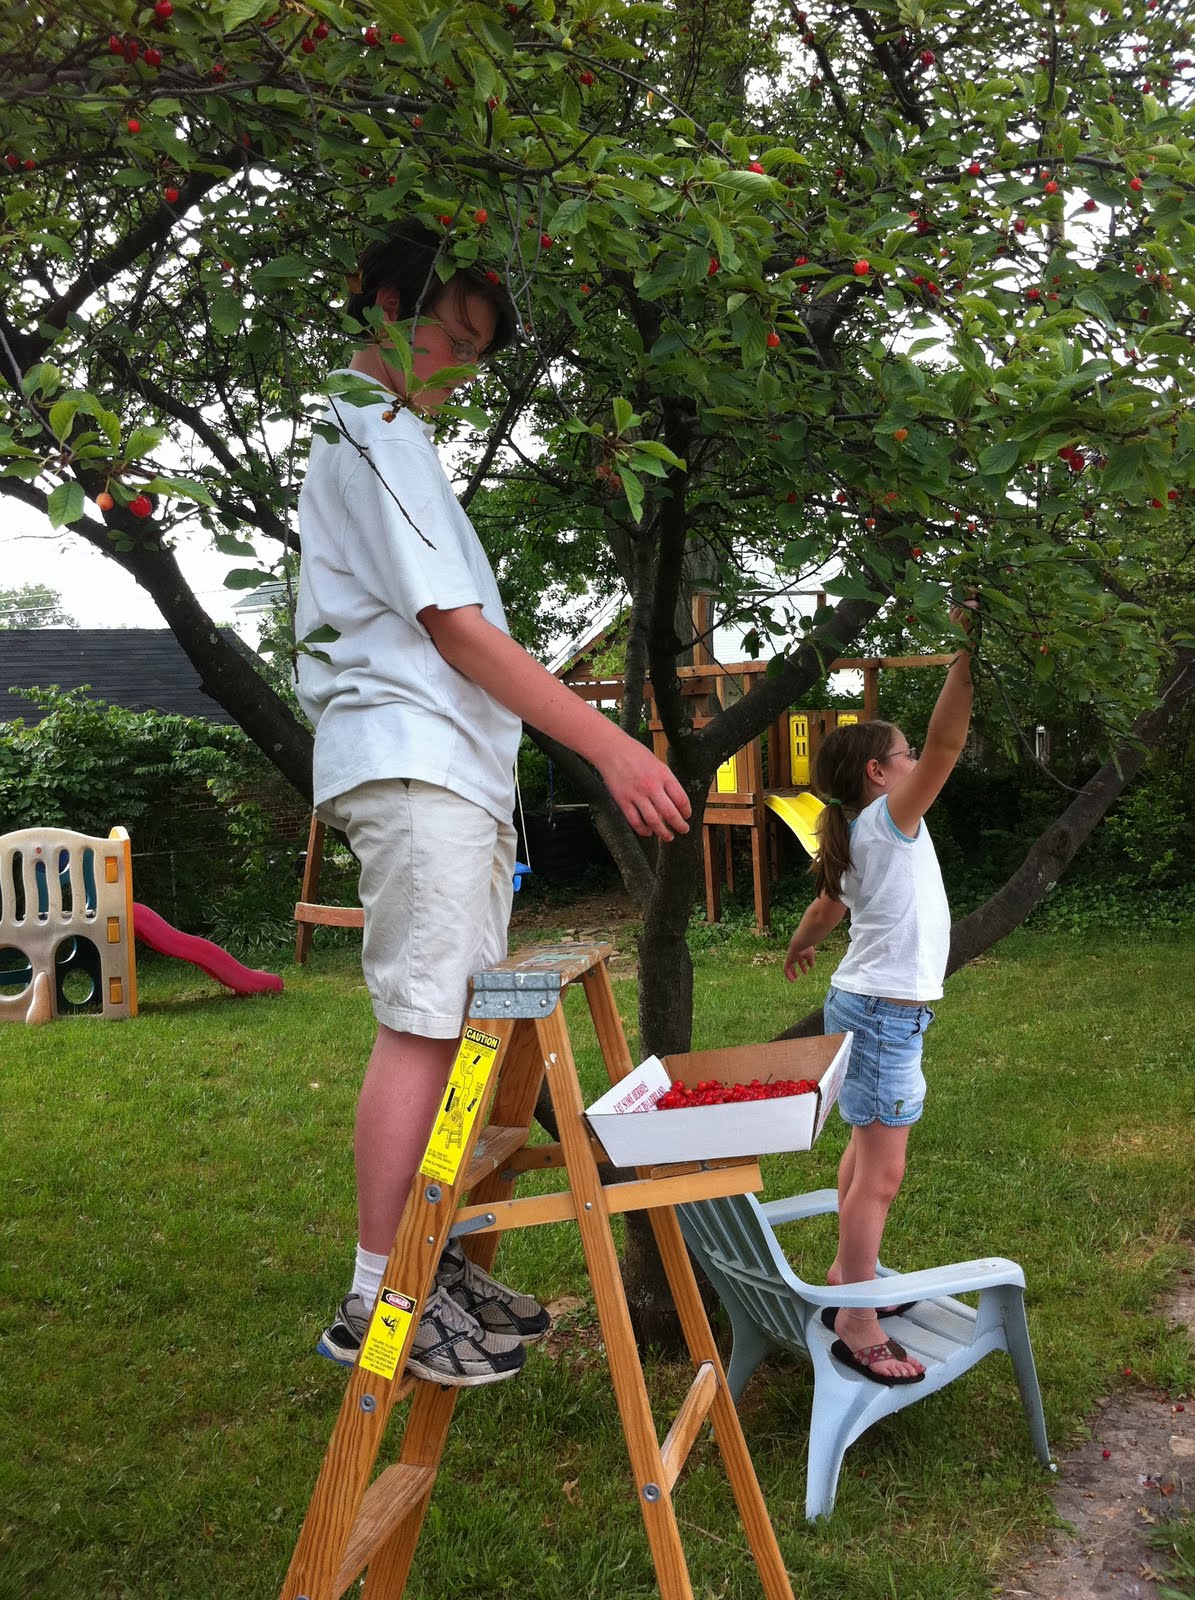
Peanut and Butter help pick cherries.
We picked as many cherries as we could reach--and some that I really shouldn't have reached.

Imagine me on tip toes on the top step of the ladder, balacing myself with a taut branch pulled close, reaching ... reaching ... for the bright red cherry just out of reach. As I was teetering there, I thought of the scene in Indiana Jones and the Last Crusade where Indiana is reaching for the grail just beyond his fingertips. I let the cherries go. (See? Movies can be good for you.)

Out-of-reach cherries notwithstanding, we still picked a huge box of cherries and took them home for pie.

Pie!

Jelly pits cherries
Butter makes pie. (And I do use butter in my pies.)


PIE!


Butter and I decided to try a beautiful lattice pie, and it was easier than we thought!  I followed instructions online at Simply Recipes.com. We were very happy with the results, but the best part was the eating.

Thursday, June 9, 2011

Fruit!

BLUEBERRIES!
I never cease to be amazed by nature. I get really excited to see things blossom and fruit. Yes, I've done this before, and yes, it is still amazing. The miracle of life. When I first see the signs of fruit, I usually throw my hands in the air and shout, "Blueberries!" or "Cucumbers!" like Tom Hanks shouting "Fire!" in the movie Castaway. I do this every year.

Last spring, I planted two blueberry bushes (of different varieties) at the base of my porch, which is partly shaded, so I wasn't sure how they would fare this year. One of my plants has done just fine--there are plump berries all over it. Yay!

The other bush only produced a few berries, which dried up right away. I don't know why. Does one get more sun than the other? Is one variety more resilient than the other? It would've made sense to label them, but I never got around to it, so I don't know which is which. But I read that the two varieties I have (Bluecrop and Bluejay) have different colors of leaves in the fall, so I'll get back to you on that.

Patio cucumbers growing ... on my patio! Yay! I may not need to self-polinate this year. I mean hand-polinate.


CUCUMBERS!
And strawberries! I'm not expecting much from this everbearing crop. (Shady yard.) I grew them in containers on my porch last year, and they grew pretty well, but chipmunks and squirrels and slugs and who knows what else ate them. I tried putting chickenwire fencing (*chicken* fencing, not chipmunk fencing--that was my mistake!) around them, but it didn't keep out the little critters.

In the fall, I planted them in the ground so the roots wouldn't freeze over the winter. They came back nicely, and are producing fruit. I'm sure we're in for another battle with the critters.

STRAWBERRIES!

Sunday, June 5, 2011

Dandelion Gardening

My front garden needed some attention. There were tremendous weeds growing in it and little else. I was pulling out dandelions larger than I had ever seen! And I was struck with an idea. I have paid good money to *buy* dandelion greens; why not add these to my salad?!?

The garden bed was close to the house, and not near the street, so I wasn't concerned with contamination from car exhaust. With gusto, I began pulling up the big weeds in my dandelion farm, and asked my daughter to wash them so we could eat them. It was almost as exciting as actual gardening! After they were washed, I dried them with towels and kept them in the fridge until dinner.

Dandelion greens are peppery, and they can overwhelm the salad, so I mixed just a few of the leaves in with romaine lettuce. We were really excited that we got some very healthy produce *free* that we almost threw in the compost bin.

Jelly (my greens-eater) was eating them right out of the ground. I had to remind her to save some weeds for dinner!

Wednesday, April 27, 2011

Homemade Marshmallow Peeps


Peep, peep!
Easter baskets don't seem the same without some marshmallow peeps. We make our own to avoid the artificial dyes that are on the store-bought ones. And YUM, they are tastier. (Hello, candy manufacturers, if you are listening, mass produce some natural peeps. I'd do it, but I'm kinda busy.)

All you need to do is follow the recipe for marshmallows from my previous post. I used four envelopes of gelatin instead of two--I wanted to make sure the marshmallow would hold it's shape when I made the peep shape. Also, I let it whip a little longer than usual to the point that the marshamallow didn't flow off the whisk like it usually does, but is thicker.


This is how you want it: thick and slow. That sounds very weird.


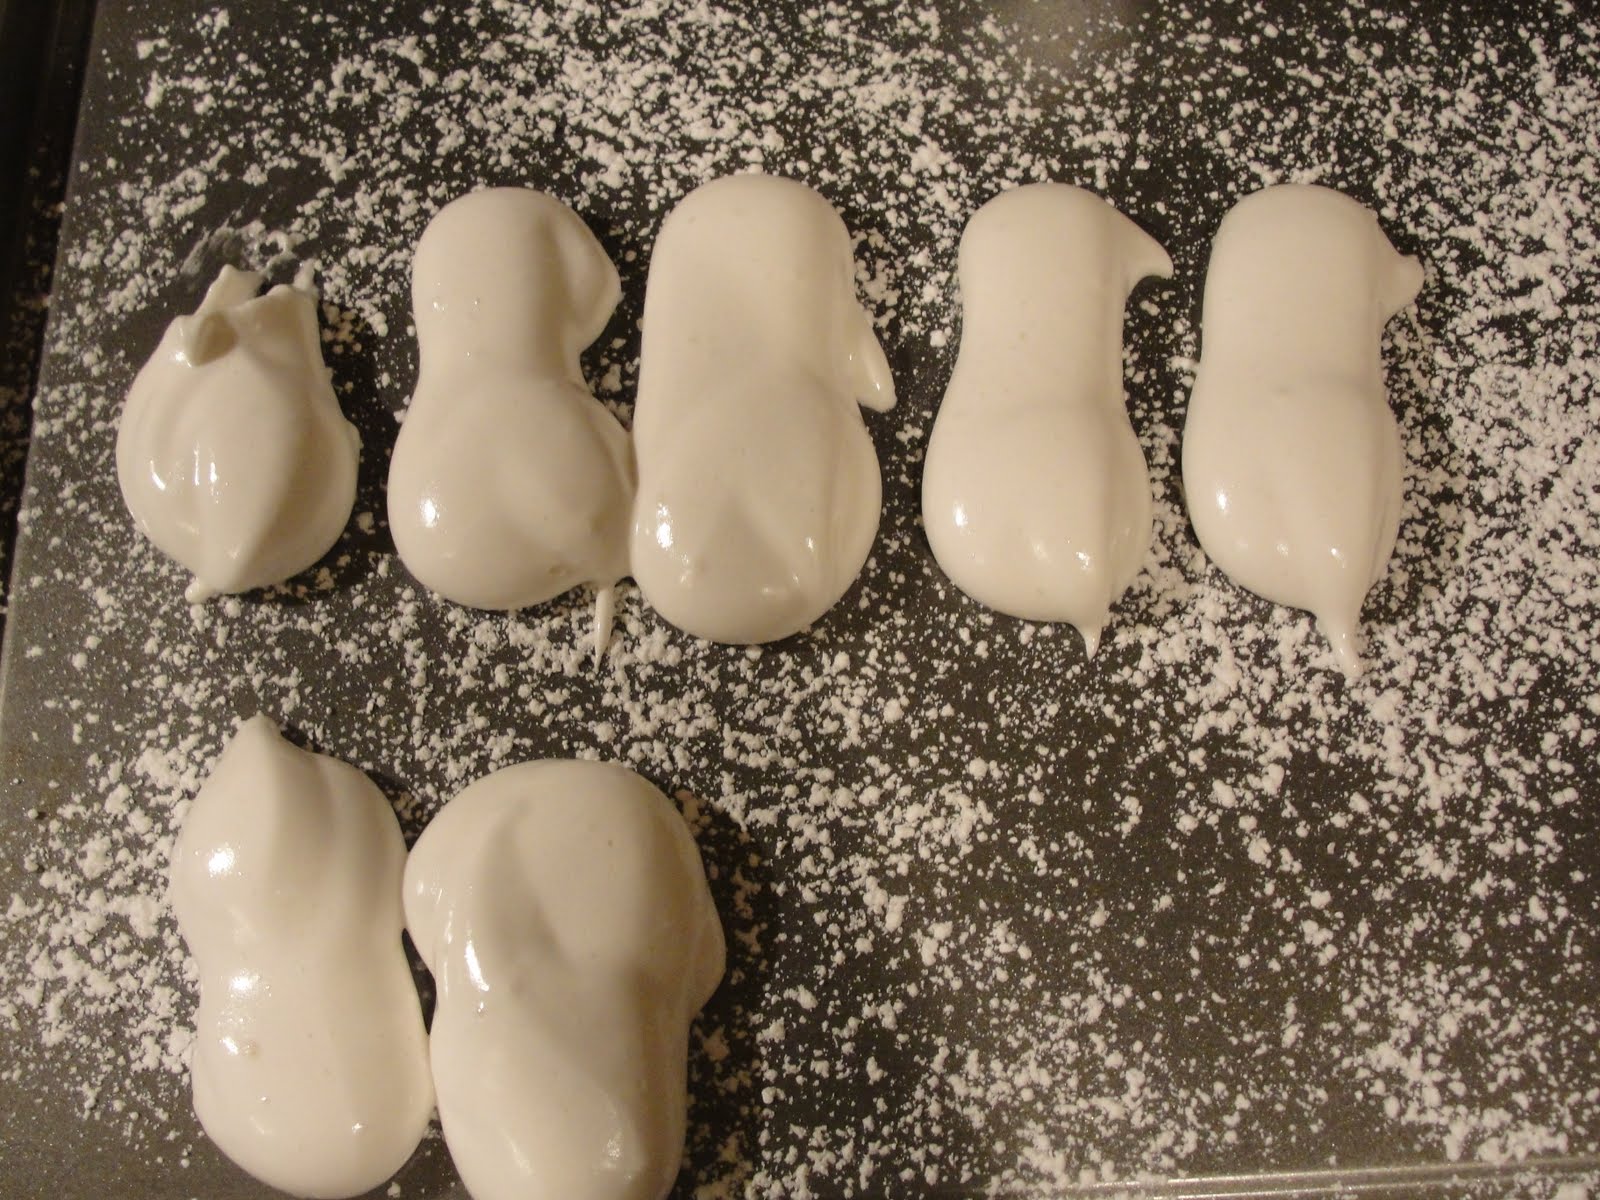
If it's not thick enough, this is what happens to your peeps:

Lazy peeps couldn't even hold their shape!

They turn into slugs. You don't want Easter slugs. So keep your marshmallow in the mixer until it's thick, thick, thick.

Now, for the piping. If you have a piping bag, you can use that. I prefer sacificing a plastic ziplock for this job (this from the mom who washes and reuses her ziplock bags) because it is very sticky and it is larger than my piping bag. Spoon the marshmallow into the bag, zip it closed and cut one of the lower corners off. I make about a half-inch wide hole so the peeps come out full (you don't want skinny worms either).

Pipe onto a baking sheet sprinkled with powdered sugar. Make a body by starting from the back and move forward. Go back about 1/4 of the way to make the head and stop squeezing the bag. Slowly pull foward to make the beak. We made a badly produced video for all you visual peeps (people, in this case. I don't think marshmallow peeps are reading this blog. Or are they?)


Here are my peeps:

They look like they're up to something.
Le them dry for about an hour, use a fork to unstick them from the baking pan, and roll in colored sugar. I bought some naturally colored sugar at Whole Foods a few years ago, and I still have it. I used a mortar and pestle to make it a little finer.

As a finishing touch, use a tooth pick and melted chocolate to give them eyes. 

And don't let your good-looking peeps ostracize the slugs. They're all the same, deep down.


Monday, April 25, 2011

Naturally-dyed Easter eggs

My kids made these naturally-colored eggs with blueberries and coffee!
Even though we have avoided food coloring for almost 6 years, we've never made naturally-colored Easter eggs. (I usually have the kids soak their eggs in the store-bought dye for only a few seconds to avoid dye migrating through the shell.) But this year, we made dyes from fruits and veggies.

I chose only a few colors to make it easier on myself. I followed the instructions here for making the dyes; I picked purple grape juice for lavender, red cabbage for blue, beet juice for pink, and turmeric for yellow. I also followed the suggestion to boil the raw eggs in the dye bath (rather than cook them beforehand) to get a more vivid color.

Grape Juice: FAIL!  The eggs cooked in purple grape juice were a complete failure--they turned out gray! And I was ticked that I wasted a half bottle of grape juice.  See my used tea bag in the background? Hee hee.

Eggs cooking in grape juice. Do not try this at home: a complete waste.

Red Cabbage: Success!  I didn't believe it that red cabbage would produce a blue egg, but it did--and a beautiful blue egg, at that. 

Cookin' the cabbage. Cabbage-inator. Cabbage-orama.

I boiled a head of purple (aka red) cabbage in enough water to cover, and cooked for about 15 - 20 minutes, until the cabbage looked pale and gross--the water was a fantastic bright purple (the color I want my hair to be). I strained out the cabbage, added the vinegar, and let the eggs simmer for 15 minutes in the dye bath. I wasn't happy with the color, which was a very pale blue, so I soaked them for another 20 minutes or so in a measuring cup (I needed my pot back). They looked great.

Turmeric: Success! Turmeric is one potent coloring agent. After just a few minutes in the turmeric water (about 1/2 Tablespoon in probably 4 cups water) the eggs were yellow. I left them in the water for 15 minutes because they had to cook. The eggs were bright yellow (and so were my fingers)!

There are eggs in that turmeric, honest.

Beets: failure. I am sad to report that my beet-colored eggs were a failure, because beets are usually my Champion of Natural Colors, and it has never let me down before. :-( At this point, I am blaming the cheap generic canned beets I bought.

Beet juice looks all nice and red, but don't let it fool you.
Surprise special guest: Green.  I dipped some of my blue eggs into the turmeric for a few minutes, with lackluster results, but I was happy, since I didn't really have a plan for green at all. The green was pale, but okay.
Beet-colored (thumbs down), turmeric yellow (wow!), red cabbage blue, and spur of the moment green.
The eggs at the top of the page were made by my kids at a local farm, so I'm not exactly sure how they did it, but the blue colored eggs were made with dye made from crushed blueberries and the creamy tan one was from coffee. I think those turned out really well!