Monday, February 14, 2011

Natural Red Velvet Cake

All Natural Red Velvet Cake
I'm not a very good cake icer.
Valentine's Day can present a challenge to those sensitive to food coloring (Red #40 is everywhere), but I look at it as an opportunity to try something new! This year, I decided to try to make a natural Red Velvet cake for Valentine's Day.

So what can you use (other than a bottle of red food coloring) to get that bright red color?  Beets!  God certainly didn't put them on earth for us to eat!  Ha ha!  No offense to those who like beets--I'm just kidding!  (not really.*)

And don't worry, you can't taste the beets at all after you add butter and sugar!

I usually color my red things with beet juice, but while googling, I discovered that beet juice in baked goods often fades (a problem with natural colors) and turns brownish.  Brown red velvet cake is not what I'm looking for.

Most of the natural recipes online had a lot of chocolate, so the red coloring is subtle, but I found one recipe for a very red Red Velvet cake using beet-root powder.  I've never used beet powder before, but I bought a bottle at the health food store**, and I am really pleased with the result!

My kids were so surprised by the red cake, they hesitated.  "Can we eat this," they all asked.  :-)  Yes!

Final verdict:  This was an unusual cake, with 6 eggs and only 3/4 cup flour.  It was very moist, but I'm going to try a white cake with the beet powder added. Then, I'm going to try a cake using beet juice to see how that compares.  I'm sure my kids will be disappointed at how much cake I'm making them eat.

_____

* I'm joking. I really am.

** I just about fell over when I saw how much the beet root powder was.  I almost didn't buy it, but my husband convinced me it would be worth it when the kids saw the RED cake.

Tuesday, February 1, 2011

Finger Knitting

 My kids are pretty quiet children--they like reading and drawing and legos, but sometimes winter days involve them climbing on each other, screaming loudly, and scaring the tar out of each other. So it is nice every so often to pull out the yarn and quiet them down with finger knitting.

We started finger knitting with just one finger.  It's super easy, and from there we can progress to 4-finger knitting.


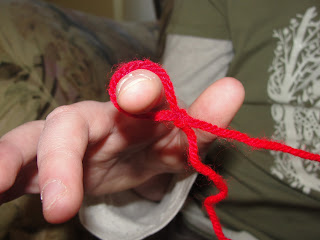
Start with a slip knot on one finger 


and bring the long piece of yarn (the one attached to the ball of yarn) 
and the loop it--front to back--over your finger.


Pull the original loop (the slip knot) over the string closest to your finger tip 


and let it fall off your finger. 


Tighten by pulling the loose "tail" of yarn.    That's it!


Add another loop of yarn and pull the first loop over the second again.


Look:  a video!


Make your knitted cord as long as you like.  When you're done, cut the tail and feed it through the loop and tighten.  Then you can trim the ends.

This is a really nice quieting activity.  It is easy and doesn't require a lot of time. We like to use our "play cords" (as we call them) for dress up, stuffed animal leashes, pretending to be animals with leashes, and lots of things.
Butter models her red cord.
Jelly's play cord is made out of really thick chenille yarn.  Nice!